Introduction
Imagine baking something warm, soft, and delicious with just a few items from your kitchen – no fancy tools, no complex steps. That’s the magic of 4 ingredient banana bread. If you’ve ever found yourself staring at ripe bananas on your counter, wondering how to use them before they go bad, you’re in the right place.
This simple recipe is not only beginner-friendly but also flexible. Whether you’re craving a quick sweet treat, need a healthier snack, or want a breakfast option that doesn’t take forever, this banana bread has you covered.
With minimal prep and a handful of basic ingredients, you can whip up a loaf that’s moist, flavorful, and utterly satisfying. Plus, it’s adaptable – perfect for gluten free, dairy free, and even vegan modifications.
Ready to transform those bananas into something amazing? Let’s dive in.
Table of Contents
Why You’ll Love This 4 Ingredient Banana Bread
Quick and Easy to Make
One of the best things about this 4 ingredient banana bread recipe is just how simple and fast it is to prepare. In less than 10 minutes, you can have the batter ready and in the oven, meaning you spend more time enjoying the results and less time fussing over complicated steps.
Unlike other recipes that require multiple stages – creaming butter, sifting flour, or carefully folding ingredients – this one streamlines the process. All you need to do is mash, mix, and bake. This makes it the ideal go-to recipe for busy mornings, last-minute guests, or when those overripe bananas need saving right away.
Additionally, this simplicity doesn’t sacrifice flavor or texture. The natural sweetness of bananas, paired with the fluffiness from baking powder and the richness of eggs, creates a loaf that tastes like it took much more effort than it actually did.
If you’ve never baked banana bread before, this is the perfect starting point. It’s practically fail-proof and yields consistently delicious results every time.
Healthy and Customizable
This banana bread isn’t just easy to make – it’s also incredibly adaptable to fit a variety of dietary needs and preferences. The minimal ingredient list already makes it a healthier option compared to traditional banana bread loaded with butter and sugar.
For those seeking a gluten free version, simply swap the all-purpose flour for a 1:1 gluten free flour blend, almond flour, or oat flour. If you’re leaning toward a vegan option, replace the eggs with flax eggs (1 tablespoon of flaxseed meal + 3 tablespoons of water per egg).
Want to skip sugar altogether? No problem. The bananas provide natural sweetness, meaning no added sugar is necessary. If you prefer a slightly sweeter loaf, a drizzle of maple syrup or honey can easily enhance the flavor without overpowering the bread’s natural taste.
You can also get creative with add-ins like:
- Chopped walnuts or pecans – for a crunchy bite.
- Chocolate chips – to satisfy sweet cravings.
- Cinnamon or nutmeg – for a warm, spiced undertone.
- Shredded coconut or blueberries – for a tropical or fruity twist.
The flexibility of this recipe means you can make it your own every time. Whether you’re craving something indulgent or trying to keep things light and nutritious, this banana bread adapts to your preferences.
No Special Equipment Required
You won’t need a stand mixer, electric beater, or any specialized baking tools to make this banana bread – just a mixing bowl, fork, loaf pan, and oven. This makes the recipe even more approachable, especially for those who may not bake regularly or have limited kitchen supplies.
Mashing bananas is easily done with a fork or potato masher, and the rest of the ingredients can be stirred together by hand. There’s no need for fancy techniques or extra bowls – everything can be mixed in one container, reducing both the prep time and cleanup afterward.
This simplicity also means fewer dishes to wash, which is always a plus. The loaf pan is the only baking tool you’ll need, and even that can be lined with parchment paper for easy removal and minimal mess.
For those living in small apartments or with limited kitchen space, this recipe is a lifesaver. The lack of complicated equipment means that anyone, regardless of their baking experience or kitchen setup, can enjoy freshly baked banana bread straight from their own oven.
Great Way to Use Ripe Bananas
If you’ve ever found yourself with a bunch of overly ripe bananas sitting on the counter, this recipe offers the perfect solution. Overripe bananas often get thrown out, but they are gold when it comes to baking banana bread.
Bananas that have developed brown spots or are too soft to eat on their own are actually ideal for this bread. Their heightened sweetness and softer texture make them easier to mash and provide better flavor to the final loaf. The natural sugars in the bananas caramelize as the bread bakes, resulting in a rich, sweet, and moist interior.
Not only does this recipe help reduce food waste, but it also turns those neglected bananas into something delicious and wholesome. You’ll feel good knowing that you’ve made good use of produce that might have otherwise gone uneaten.
Here are a few tips for managing ripe bananas:
- Freeze them – Peel and freeze overripe bananas in a ziplock bag. Defrost them when ready to bake.
- Refrigerate – Soft bananas will stay fresh for a few extra days in the fridge.
- Use immediately – The riper the banana, the more flavorful the bread will be.
Banana bread is one of those recipes that feels rewarding because it transforms what seems like a kitchen leftover into something comforting and delicious.
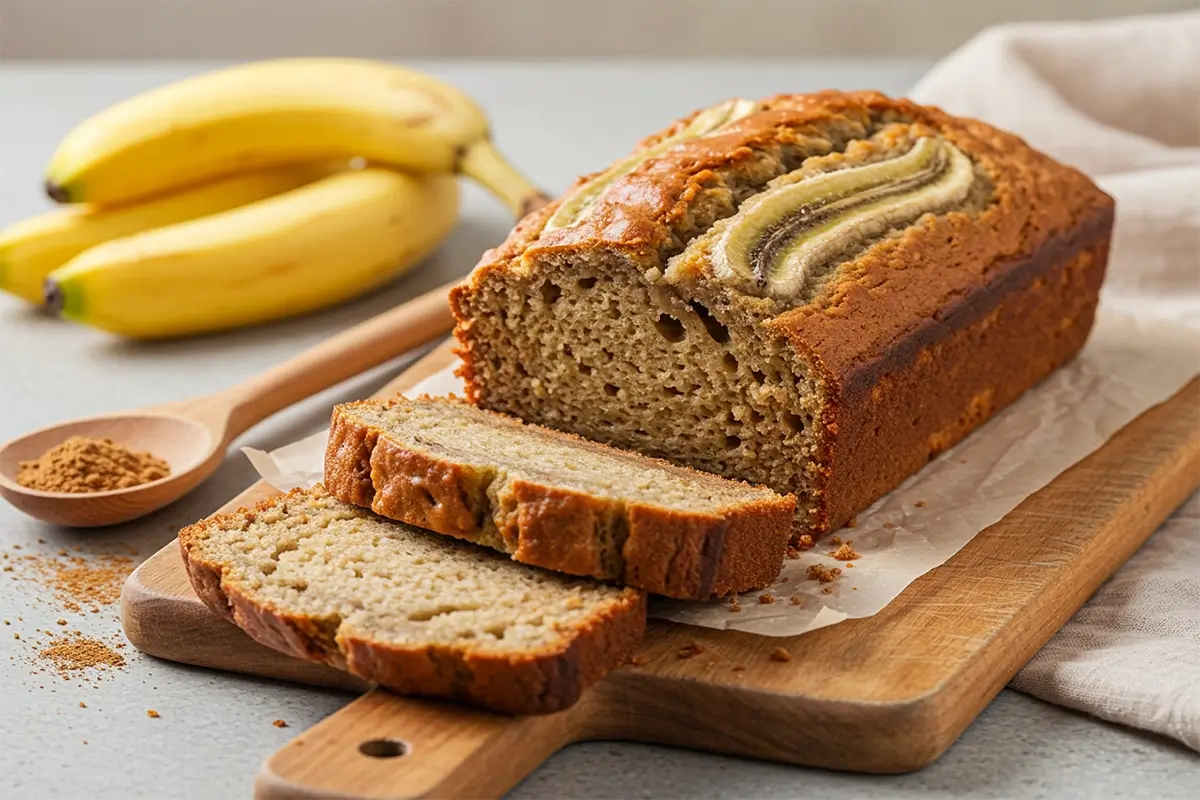
Ingredients you will need for the recipe (only 4!)
The beauty of this banana bread recipe lies in its simplicity. With just four ingredients, you can make a delicious loaf that’s both easy to prepare and utterly satisfying. Let’s take a closer look at each ingredient and why it’s essential to this recipe.
| Ingredient | Amount | Why You Need It |
|---|---|---|
| Bananas | 3 large | Bananas are the main source of sweetness and moisture. Overripe bananas, with their natural sugars and softer texture, create a tender and flavorful loaf. They also eliminate the need for added sugar. |
| Flour | 1 ½ cups | Flour provides the structure and base for the bread. You can use all-purpose flour for a classic loaf, or opt for gluten free, almond, or oat flour for a healthier or allergy-friendly version. |
| Eggs | 2 | Eggs help bind the ingredients together, adding moisture and contributing to the rise and fluffiness of the bread. For a vegan version, flaxseed eggs can be used as a substitute. |
| Baking Powder | 1 tsp | Baking powder is the leavening agent that helps the bread rise. It ensures the loaf is light and fluffy, without being dense. A gluten free baking powder works just as well for those avoiding gluten. |
Optional Add-ins
While the core of this recipe is based on just four ingredients, you can easily customize your banana bread with a variety of add-ins to suit your preferences. Here are some popular options:
| Add-in | Why Add It |
|---|---|
| Vanilla extract | Adds a warm, aromatic flavor that complements the banana’s sweetness. |
| Cinnamon or Nutmeg | Spices up the loaf with a cozy, warm taste. Perfect for autumn or winter baking. |
| Chocolate chips | For a sweet, indulgent twist, add semi-sweet or dark chocolate chips. |
| Nuts (walnuts, pecans, etc.) | Adds crunch and texture while boosting the flavor profile. Walnuts are a classic choice. |
| Shredded coconut | For a tropical vibe, coconut adds a slight sweetness and texture. |
| Blueberries | Adds a burst of fruity freshness, balancing the richness of the banana bread. |
These optional ingredients aren’t necessary, but they elevate the bread’s flavor and texture, allowing you to experiment with different variations.
Ingredient Substitutions
What if you’re missing one of the ingredients or have dietary preferences? No problem! This recipe is incredibly flexible and can accommodate several substitutions:
| Ingredient | Substitution Options |
|---|---|
| Flour | Gluten free flour (1:1 ratio), almond flour, oat flour, or coconut flour. You may need to adjust the liquid based on the flour type. |
| Eggs | Flaxseed eggs (1 tbsp flaxseed meal + 3 tbsp water per egg), chia eggs, or unsweetened applesauce (¼ cup per egg). |
| Baking Powder | Baking soda (use ½ tsp instead of 1 tsp), or make your own by combining 1 part baking soda with 2 parts cream of tartar. |
| Bananas | You can use mashed plantains or applesauce in a pinch, but the flavor and texture will vary slightly. |
These substitutions make the recipe even more versatile, so you can easily adapt it to meet your needs or work with what you have on hand. Whether you’re gluten free, vegan, or just trying to use up what’s in your pantry, this recipe is forgiving and adaptable.
Fresh vs. Frozen Bananas
While the recipe calls for fresh, ripe bananas, you can also use frozen bananas. In fact, using frozen bananas is a great way to store ripe bananas that might otherwise go to waste. Simply peel and freeze your overripe bananas in a ziplock bag. When you’re ready to bake, let them thaw for a few minutes or microwave them for about 30 seconds to soften. They will be mushy and perfect for mashing into the bread.
Frozen bananas will still yield a moist loaf, and the thawed bananas will release a bit more liquid. You may need to reduce the liquid from other ingredients (like any added sweetener or milk) to compensate, but the flavor remains just as delicious.
Why These Ingredients Work Together
Each ingredient in this recipe plays a crucial role in creating the ideal banana bread:
- Bananas provide the moisture and natural sweetness, eliminating the need for added sugar. Their natural sugars caramelize as the bread bakes, creating a soft, tender crumb.
- Flour serves as the structure of the bread. It forms the base that holds everything together. Choosing gluten free or nut-based flours can slightly change the texture and flavor, but the bread will still come out delicious.
- Eggs bind the ingredients together while adding richness and fluffiness to the loaf. They help the bread rise, ensuring it’s not dense or heavy.
- Baking powder provides the leavening, giving the bread its light and airy texture. It helps the bread rise without needing yeast or long rising times.
These four simple ingredients come together in a perfect balance, resulting in a moist, flavorful loaf every time. The ease of using ingredients that you likely already have in your kitchen is another reason this recipe is so popular.
By understanding the role of each ingredient, you can make informed decisions if you choose to substitute or modify the recipe to suit your preferences or dietary needs. Whether you stick to the basic four ingredients or get creative with add-ins and substitutions, the result will be a delicious, satisfying loaf of banana bread that’s sure to impress!
Step-by-Step Instructions
Making 4 ingredient banana bread is as simple as it gets, but following the right steps ensures you’ll get the perfect loaf every time. Here’s a detailed, step-by-step breakdown of the process, along with helpful tips to guide you through each stage.
Step 1: Preheat and Prepare
The first thing you’ll want to do before you begin mixing ingredients is to prepare your oven and baking pan.
- Preheat the Oven: Set your oven to 350°F (175°C). This is the ideal temperature for baking banana bread and ensures that the bread cooks evenly without drying out.
- Prepare the Loaf Pan: Lightly grease your loaf pan with cooking spray or butter, or line it with parchment paper for easy removal. If you’re using a nonstick pan, greasing it is still a good idea to avoid any sticking. A standard 9×5-inch loaf pan works best for this recipe, but if you don’t have one, you can use a slightly smaller or larger pan, just be mindful of the baking time.
Pro Tip: To make cleanup easier, line the pan with parchment paper and leave an overhang on both sides. This way, after baking, you can simply lift the banana bread out of the pan using the paper.
Step 2: Mash the Bananas
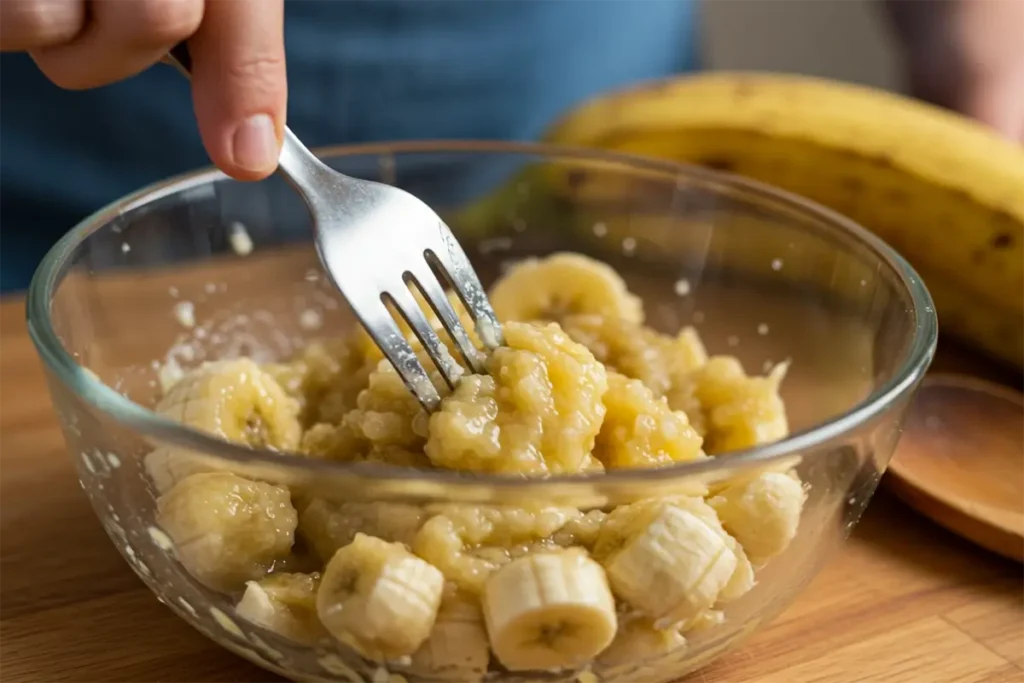
Now it’s time to prepare the star of the show – the bananas! Ripe bananas are key to achieving a moist and flavorful banana bread, so make sure they are well beyond the yellow stage with plenty of brown spots. The riper, the better. Overripe bananas not only provide the best flavor but are also easier to mash.
- Peel the Bananas: Take 3 ripe bananas, peel them, and place them in a large mixing bowl.
- Mash the Bananas: Using a fork or potato masher, mash the bananas until they are smooth with just a few small lumps. The goal is to break them down into a liquid consistency without leaving too many chunks. If you prefer a slightly chunkier texture, feel free to leave a few lumps.
Pro Tip: If you don’t have ripe bananas at hand, you can speed up the ripening process by placing them in a paper bag for a day or two. Alternatively, you can place them in the oven at 300°F for 15–20 minutes to soften them quickly.
Step 3: Mix the Ingredients
Once the bananas are mashed, it’s time to bring everything together. This is the stage where you’ll add the other key ingredients: eggs, flour, and baking powder. Be sure to mix everything thoroughly, but don’t overmix, as this can lead to a denser loaf.
- Add the Eggs: Crack two eggs into the mashed bananas. The eggs provide structure and moisture, so it’s important not to skip this step.
- Stir the Eggs: Use a fork or spoon to mix the eggs into the bananas until they are fully combined.
- Add the Flour and Baking Powder: Gradually add 1 ½ cups of flour (your choice of flour – all-purpose, gluten-free, almond, or oat) and 1 teaspoon of baking powder. Stir gently until the flour is fully incorporated, and the batter comes together. It’s important to avoid overmixing at this stage because it could cause the bread to be too dense.
Pro Tip: If you’re using gluten-free or almond flour, be aware that the texture might be slightly different. The banana bread may have a denser crumb, but it will still be delicious.
Step 4: Pour the Batter into the Pan

Now that your batter is ready, transfer it to the prepared loaf pan. Use a spatula to scrape the sides of the bowl and ensure that all of the batter gets into the pan. Spread the batter evenly to ensure it bakes uniformly.
- Level the Batter: Once you’ve poured the batter into the pan, use a spatula to smooth the top of the batter. This will help the bread bake evenly and have a smooth top.
- Optional Add-ins: If you’re using any optional add-ins like chocolate chips, nuts, or dried fruit, gently fold them into the batter at this stage. Make sure not to overmix, as this could alter the texture of the bread.
Pro Tip: If you like your banana bread with a slightly crispy top, you can sprinkle a few extra oats, cinnamon, or sugar on top of the batter before baking. This adds a lovely golden finish to the bread.
Step 5: Bake the Bread
It’s time to get the banana bread into the oven.
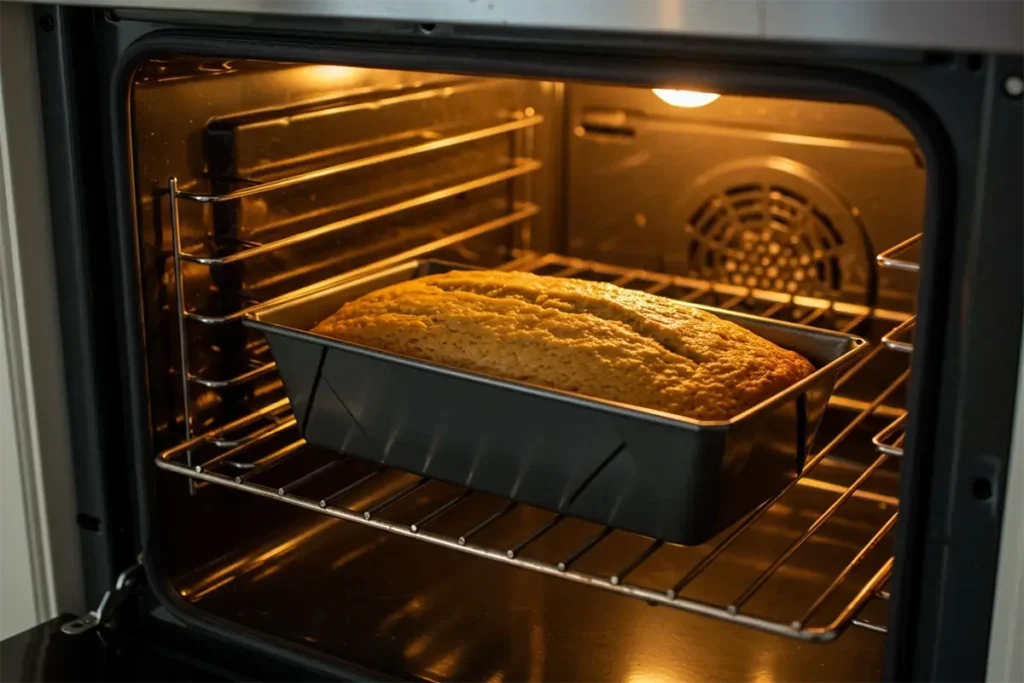
- Bake at 350°F (175°C) for 45-50 minutes, or until a toothpick or cake tester inserted into the center comes out clean (with a few moist crumbs but no wet batter). Monitor the bread as it nears the end of the baking time. If the top is browning too quickly, you can cover it loosely with aluminum foil to prevent overbaking.
- Check for doneness by inserting a toothpick into the center of the loaf. If it comes out clean, your banana bread is done. If there’s batter on the toothpick, let the bread bake for an additional 5 minutes and check again.
Pro Tip: Ovens can vary, so check the banana bread around the 40-minute mark. If it’s not quite done, let it bake a little longer, but make sure not to overbake, as this can lead to dry banana bread.
Step 6: Cool and Remove from the Pan
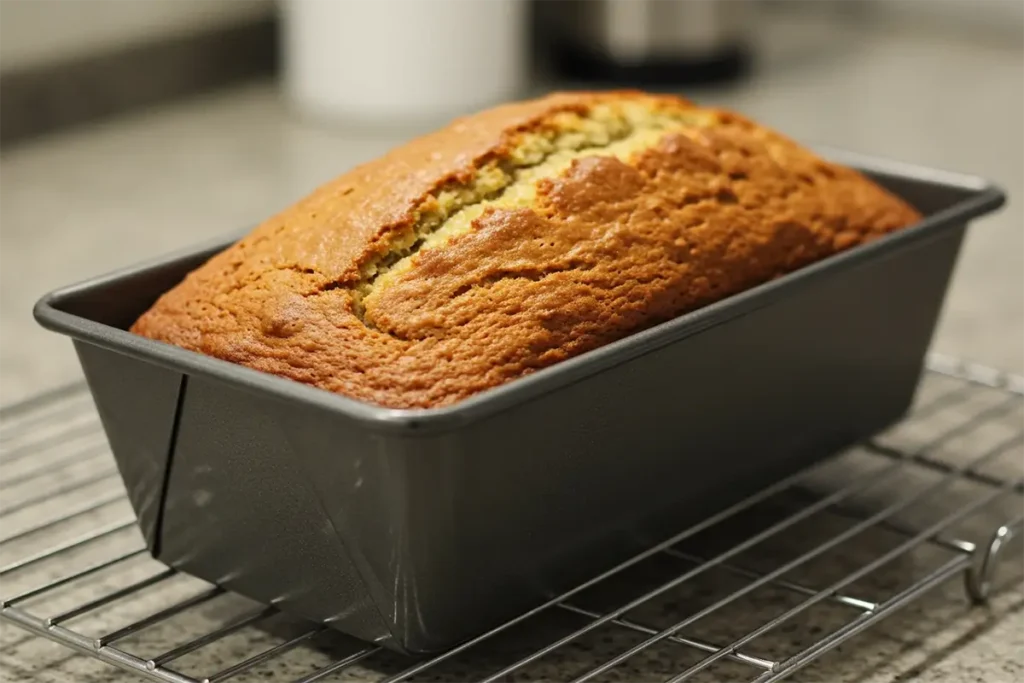
Once your banana bread is done baking, it’s important to let it cool before slicing. If you try to slice it too soon, it could fall apart or be too gooey in the center.
- Let the bread rest in the pan for around 10 minutes to cool. This gives it time to firm up and makes it easier to remove.
- Transfer to a Wire Rack: After the 10 minutes of cooling, use the parchment paper (if you used it) or carefully run a knife around the edges of the pan to release the bread. Transfer the loaf to a wire rack to cool completely.
Pro Tip: Let the bread cool for at least 30 minutes before slicing, so the texture sets. If you’re patient, the bread will hold its shape better and the flavor will develop even further.

Conclusion
By following these simple steps, you can have a fresh loaf of banana bread ready to enjoy in under an hour. From mashing the bananas to baking the perfect loaf, every step is easy to follow, and the results are consistently delicious. Whether you’re a beginner baker or a seasoned pro, this recipe is sure to become a go-to favorite in your kitchen!
Tips for the Best 4 Ingredient Banana Bread
While the 4 ingredient banana bread recipe is incredibly straightforward, a few simple tips can elevate your results and ensure that your loaf turns out perfectly every time. Here are some essential tips to help you achieve the best banana bread, from texture to flavor.
1. Use Overripe Bananas
The key to great banana bread lies in the bananas you use. Overripe bananas, those with plenty of brown spots or even a few black ones, are the ideal choice. They are much sweeter than yellow bananas and contribute to the moistness of the loaf.
- Why Overripe? Ripe bananas not only offer a richer flavor but also break down more easily when mashed. Their natural sugars caramelize as they bake, giving the bread a rich, golden color and delicious flavor.
- Pro Tip: If you don’t have overripe bananas, you can speed up the ripening process by placing them in a paper bag for a couple of days. You can also bake them at 300°F for 15–20 minutes to soften them quickly.
2. Don’t Overmix the Batter
When mixing the ingredients together, be sure to mix until just combined. Overmixing the batter can lead to a dense loaf that doesn’t rise as much as it should.
- Why It Matters: Overmixing activates the gluten in the flour too much, which can result in a chewy, tough texture rather than the soft, fluffy crumb you want.
- Pro Tip: Stir the ingredients gently with a spatula or wooden spoon, and stop mixing as soon as you see that no dry flour remains.
3. Check the Consistency of Your Batter
Banana bread batter should be thick but pourable. If the batter seems too thick, especially when using alternative flours like almond or oat flour, add a tablespoon or two of water, milk, or almond milk to loosen it up.
- Why It Matters: The consistency of the batter influences how the loaf bakes. Too thick a batter may cause uneven cooking, while too runny a batter may result in a more cake-like texture.
- Pro Tip: After mixing, if the batter feels too dense, add a little liquid at a time to achieve the perfect consistency. The batter should easily spread into the loaf pan but still hold its shape.
4. Don’t Skip the Baking Powder
Even though this recipe is minimalist, don’t skip the baking powder. It is crucial for helping the bread rise and become light and fluffy. Without it, your loaf will be dense and heavy.
- Why It Matters: Baking powder is a leavening agent that causes the batter to rise as it bakes, making the bread soft and airy.
- Pro Tip: Ensure that your baking powder is fresh. Old baking powder may lose its effectiveness, leading to a flat loaf. You can check it by adding a teaspoon of baking powder to a cup of hot water – it should bubble vigorously if it’s still active.
5. Customize Your Banana Bread
One of the joys of this recipe is its versatility. You can easily make it your own by adding optional ingredients like nuts, chocolate chips, or spices.
- Why Customize? Personalizing the bread with ingredients you love can make it even more special. You could make a comforting classic banana bread with cinnamon and walnuts, or add some indulgent chocolate chips for a sweeter treat.
- Pro Tip: If you’re adding ingredients like nuts or chocolate chips, fold them in gently at the end of the mixing process to avoid overmixing the batter.
6. Use Room Temperature Eggs
For the best results, use room temperature eggs. Cold eggs from the fridge can cause the batter to seize up when mixed with the bananas.
- Why It Matters: Room temperature eggs mix more evenly into the batter and help it rise properly, ensuring a smoother texture. Cold eggs can also affect how the batter bakes, causing uneven results.
- Pro Tip: To bring eggs to room temperature quickly, place them in a bowl of warm (not hot) water for about 5–10 minutes before using them.
7. Test for Doneness Carefully
Banana bread can be deceptive when it comes to knowing if it’s done. You don’t want to underbake it, but you also don’t want it to overbake and dry out.
- Why It Matters: Banana bread needs enough time in the oven to cook through, but baking it for too long can cause it to dry out, while underbaking will leave it too moist and gooey inside.
- Pro Tip: To test for doneness, insert a toothpick or cake tester into the center of the loaf. If it comes out clean with just a few moist crumbs, your banana bread is ready. If it’s covered in wet batter, give it a few more minutes and test again.
8. Let It Cool Before Slicing
It can be tempting to slice into your fresh banana bread right away, but for the best texture and flavor, let it cool completely before cutting.
- Why It Matters: Cooling the bread allows the flavors to set and helps it firm up. Cutting into it too early can result in a mushy, overly moist loaf that falls apart.
- Pro Tip: Allow the bread to cool in the pan for about 10 minutes before transferring it to a wire rack to cool completely. This ensures that it holds its shape while slicing.
9. Store It Properly for Maximum Freshness
If you have leftovers, store your banana bread properly to keep it fresh and moist for longer.
- Why It Matters: Banana bread is best enjoyed within a few days, but if stored properly, it can last for up to a week.
- Pro Tip: Wrap the cooled bread in plastic wrap or place it in an airtight container. You can also freeze slices for up to 2-3 months if you want to keep them for longer. Just make sure to let the slices cool completely before freezing.
10. Don’t Be Afraid to Experiment
While this recipe is already fantastic as is, there’s always room to experiment. Feel free to adjust the flavor profile, texture, or sweetness according to your preferences.
- Why It Matters: Experimentation is a great way to discover new flavor combinations and make the recipe your own. Try adding ingredients like peanut butter, coconut, or even a swirl of caramel for something unique.
- Pro Tip: Keep track of your variations, so you can recreate your favorite versions of the bread in the future!
By following these tips, you’ll be well on your way to baking the perfect 4 ingredient banana bread. Whether you’re a beginner or a seasoned baker, these small adjustments can make a big difference in the final result, ensuring that your banana bread is consistently moist, flavorful, and downright delicious!
Storage and Freezing Instructions
Banana bread tastes even better the next day, but proper storage is key to keeping it fresh.
| Storage Method | Duration | Tips |
|---|---|---|
| Room Temperature | 2-3 days | Store in an airtight container |
| Refrigerator | 5-7 days | Wrap in plastic or foil |
| Freezer | Up to 3 months | Slice before freezing for easy thawing |
Freezing Tip: Place individual slices in freezer-safe bags for quick, grab-and-go snacks.
FAQ: Quick Answers About 4 Ingredient Banana Bread
1. Can I use frozen bananas?
Yes, frozen bananas work great! Thaw them, drain any excess moisture, and mash before using.
2. Can I make it without eggs?
Yes! Use a flaxseed or chia egg, or mashed avocado as an egg substitute.
3. How do I make it gluten-free?
Simply substitute regular flour with a gluten-free blend, ensuring it has a binding agent like xanthan gum.
4. How long does it last?
Banana bread lasts 3-4 days at room temperature, or you can freeze it for up to 2-3 months.
5. Can I add mix-ins?
Absolutely! Add chocolate chips, nuts, or dried fruit, but fold them in gently to avoid overmixing.
6. Can I double the recipe?
Yes, but be sure to adjust the baking time and check for doneness. Use two pans for even baking.
7. Why is my bread too dense?
It could be overmixed or made with bananas that aren’t ripe enough. Be sure to mix gently and use overripe bananas.
8. How can I make it sweeter?
Add honey, maple syrup, or brown sugar for extra sweetness, or rely on naturally sweet overripe bananas.
Conclusion: Why 4 Ingredient Banana Bread is Your New Favorite Recipe
In conclusion, 4 ingredient banana bread is the perfect recipe for anyone who craves something simple, delicious, and customizable. Whether you’re a beginner in the kitchen or a seasoned baker looking for a quick treat, this banana bread recipe checks all the boxes. It’s easy to make, requires minimal ingredients, and is incredibly versatile, allowing you to tweak it to suit your taste preferences.
What makes this recipe even more appealing is how adaptable it is. You can experiment with various flavor combinations by adding mix-ins like nuts, chocolate chips, or even a dash of cinnamon. If you’re looking to make it healthier, there are plenty of substitutions for the flour and sweeteners, making it an ideal choice for those on gluten-free, vegan, or sugar-free diets. Plus, it’s a great way to use up those overripe bananas that might otherwise go to waste.
By following the simple steps outlined in this recipe, you’ll be able to enjoy a warm, moist, and flavorful loaf of banana bread in no time. It’s perfect for breakfast, a snack, or even a dessert, making it an all-around crowd-pleaser.
Whether you enjoy it fresh out of the oven or as a leftover treat, this 4 ingredient banana bread is sure to become a staple in your baking routine. Plus, with the tips and tricks provided throughout this post, you’re guaranteed to bake a perfect loaf every time.
So, what are you waiting for? Grab those bananas and start baking! Your new favorite banana bread recipe is just a few simple steps away.