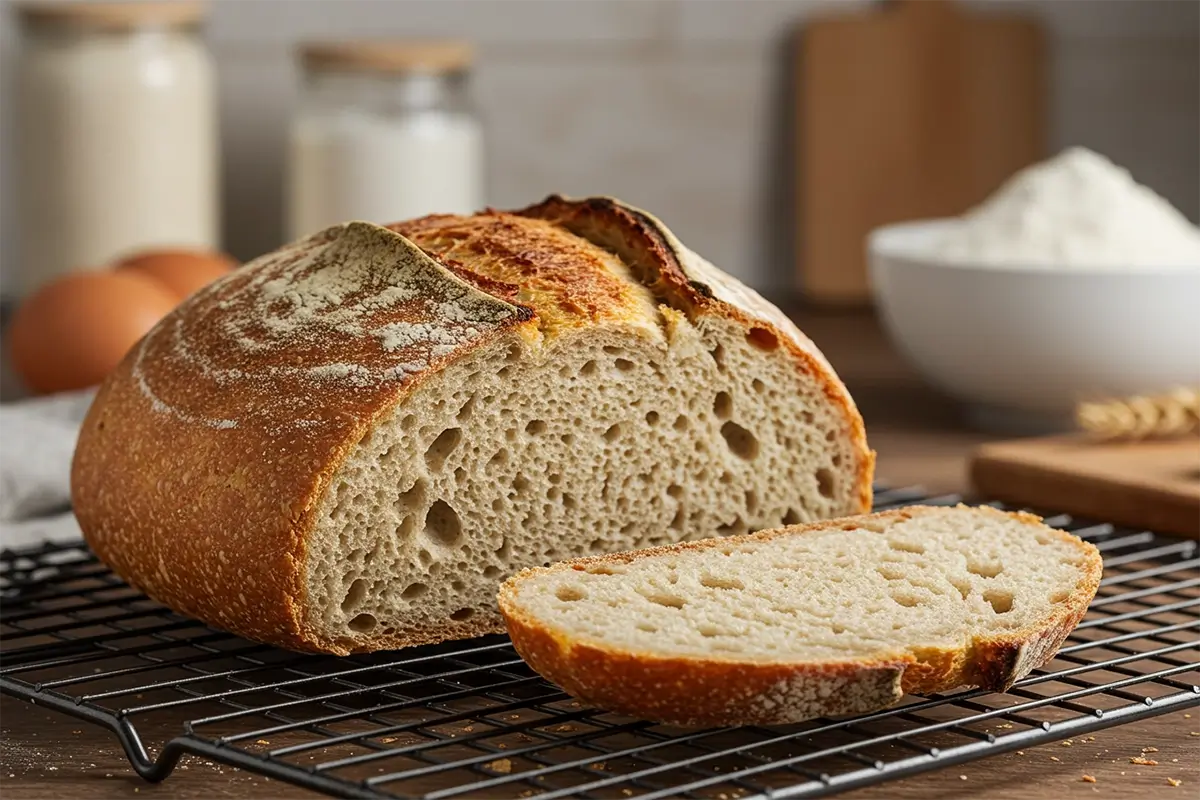
Introduction
There’s something magical about the smell of freshly baked bread wafting through your home—a warmth that wraps around you like a cozy blanket on a chilly day. But if you’ve ever had to navigate the world of gluten free baking, you know that magic can feel elusive. The longing for a loaf that’s soft, tangy, and crusty all at once might seem like a distant dream.
I’ve been there too. The countless store-bought options that crumble in your hands, the recipes that promise perfection but deliver disappointment—it can leave you feeling frustrated. That’s why I set out to create a gluten free sourdough bread recipe that doesn’t just work but brings back the joy of homemade bread.
Whether you’re new to gluten free baking or a seasoned pro looking for a foolproof sourdough recipe, this is for you. Together, we’ll create a loaf that not only satisfies your taste buds but also reminds you of the simple pleasures that homemade bread can bring. Let’s get started!
What Is Gluten Free Sourdough Bread?
Gluten free sourdough bread is a delicious alternative to traditional sourdough, crafted without wheat or other gluten-containing grains. It preserves the classic tangy flavor and airy texture of sourdough while being suitable for those with gluten sensitivities, celiac disease, or dietary preferences. Here’s a deeper dive into what makes gluten free sourdough bread unique:
How It Differs from Traditional Sourdough
Traditional sourdough bread relies on gluten-containing flours like wheat, rye, or spelt, which provide structure and elasticity to the dough. Gluten free sourdough bread, however, uses alternatives like rice flour, tapioca starch, or almond flour.
Without gluten, achieving the same elasticity and rise can be a challenge, but it’s not impossible. Using a gluten free sourdough starter and a carefully balanced blend of flours, bakers can replicate the soft, airy interior and crispy crust that sourdough bread lovers adore.
Health Benefits of Gluten Free Sourdough Bread
- Easier Digestion: The fermentation process in sourdough helps break down complex carbohydrates and proteins, making it easier on your stomach.
- Gut-Friendly: Sourdough’s natural fermentation fosters the growth of beneficial bacteria, which can support gut health.
- Nutrient Absorption: The fermentation process also increases the bioavailability of nutrients like vitamins and minerals, ensuring you get more out of every bite.
- Diet-Friendly: Gluten free sourdough is perfect for those following gluten free, low-FODMAP, or other restrictive diets.
Why Make It at Home?
While store-bought gluten free sourdough bread is convenient, it often falls short in taste, texture, or ingredient quality. Making it at home allows you to:
- Control the Ingredients: Skip unnecessary additives and focus on wholesome, natural components.
- Customize to Your Taste: Add your favorite seeds, herbs, or grains to create a bread that’s uniquely yours.
- Save Money: Gluten free artisan bread from the store can be expensive, but making your own is more cost-effective in the long run.
- Enjoy Freshness: There’s no comparison to the taste of freshly baked sourdough straight from your oven.
In essence, gluten free sourdough bread is not just a dietary alternative—it’s a flavorful, nutritious, and rewarding baking project that brings joy and satisfaction to your kitchen.
ngredients for the Perfect Gluten Free Sourdough Bread
Crafting the perfect gluten free sourdough bread starts with using the right ingredients. Each component plays a critical role in creating a loaf that is soft, tangy, and beautifully textured. Below is a detailed breakdown of essential and optional ingredients, along with their roles in the recipe.
Essential Ingredients
| Ingredient | Role in the Recipe | Examples/Notes |
|---|---|---|
| Gluten Free Flour | Forms the base of the dough, providing structure and flavor. | A mix of rice flour, tapioca starch, and sorghum flour works well for balance. |
| Sourdough Starter | Acts as the leavening agent, giving the bread its rise and signature tangy flavor. | Use a well-fed gluten free starter made with rice or sorghum flour. |
| Water | Hydrates the dough and activates the sourdough starter for fermentation. | Use filtered or distilled water to avoid interfering with fermentation. |
| Salt | Enhances flavor and regulates fermentation speed. | Fine sea salt or Himalayan salt is preferred. |
| Psyllium Husk Powder | Mimics the elasticity of gluten, helping to bind the dough and improve texture. | Essential for structure; substitute with xanthan gum if needed (though less ideal). |
Optional Add-Ins
| Ingredient | Purpose | Examples/Notes |
|---|---|---|
| Seeds | Add texture, flavor, and nutritional value. | Sunflower seeds, chia seeds, or flaxseeds. |
| Herbs and Spices | Enhance flavor and make the bread more versatile for savory dishes. | Rosemary, thyme, garlic powder, or onion powder. |
| Sweeteners | Balance the tangy flavor of sourdough and enhance browning. | Honey, maple syrup, or coconut sugar (use sparingly). |
| Dried Fruits or Nuts | Add sweetness or crunch for a more artisanal feel. | Raisins, cranberries, walnuts, or pecans. |
Why These Ingredients Matter
Each ingredient is selected to balance the challenges of gluten free baking:
- Flour Blends: Since gluten free flours lack elasticity, combining flours ensures the bread isn’t too dense or crumbly.
- Psyllium Husk: Acts as a natural binder, improving dough elasticity and final loaf texture.
- Sourdough Starter: This ingredient does the heavy lifting of fermentation, developing complex flavors and giving the bread its rise.
- Add-Ins: Optional ingredients personalize the recipe and elevate the bread to gourmet status.
Tips for Choosing Ingredients
Experimentation: Try different add-ins to discover your favorite combinations.
Flour Balance: Avoid relying on a single type of flour; combine light flours (e.g., rice) with denser ones (e.g., sorghum).
Freshness: Use fresh psyllium husk and active sourdough starter for best results.
Step-by-Step Guide to Making Gluten Free Sourdough Bread
Baking gluten free sourdough bread might seem daunting at first, but with the right approach and patience, it becomes an enjoyable and rewarding experience. Below is a comprehensive step-by-step guide to help you through each stage of the process—from preparing the starter to baking the perfect loaf.
Preparing the Gluten Free Sourdough Starter
A sourdough starter is a mixture of flour and water that captures wild yeast from the environment, creating natural leavening for your bread. It can take several days to develop a healthy, active starter, but the effort is well worth it for the depth of flavor it imparts to the bread.
| Step | Details |
|---|---|
| Day 1: Mix the Starter | Combine equal parts gluten free flour (e.g., brown rice flour) and water in a jar. Stir well and cover loosely with a cloth or lid. Leave at room temperature for 24 hours. |
| Day 2-3: Feed the Starter | Discard half of the mixture, then add fresh flour and water in equal amounts. Stir and cover again. Feed your starter every 24 hours until it becomes bubbly and active. |
| Day 4-5: Ready for Use | Your starter should be doubled in size within 4-6 hours of feeding. It should have a tangy, slightly fruity aroma. When it’s bubbly and rising quickly, it’s ready for your bread dough. |
Tip: If you need your starter sooner, you can speed up the fermentation process by using warm water and placing the jar in a warm spot.
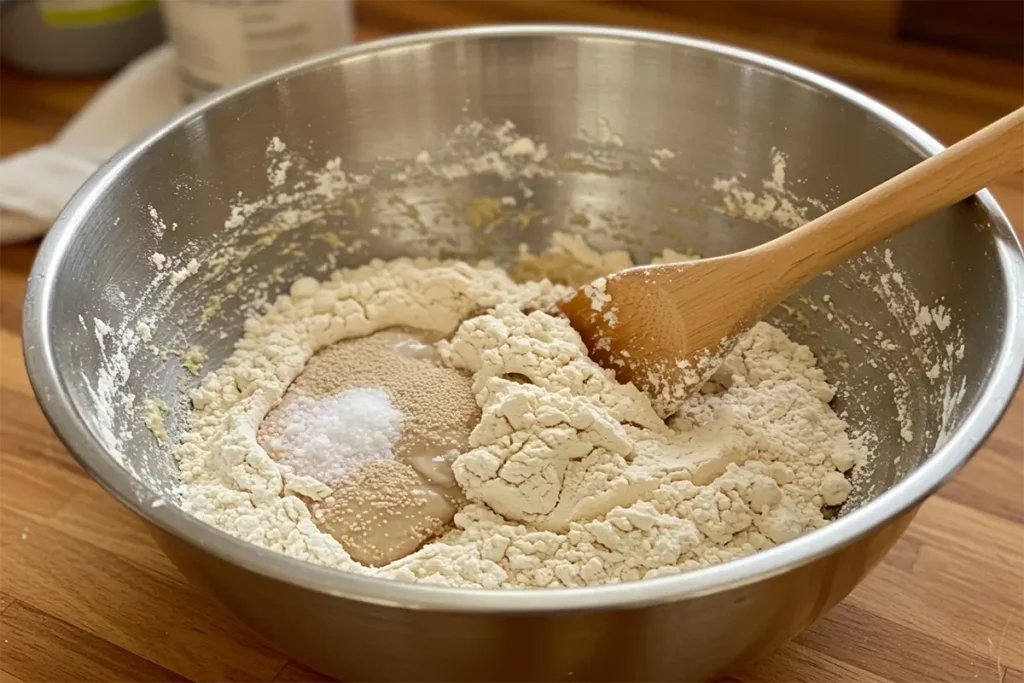
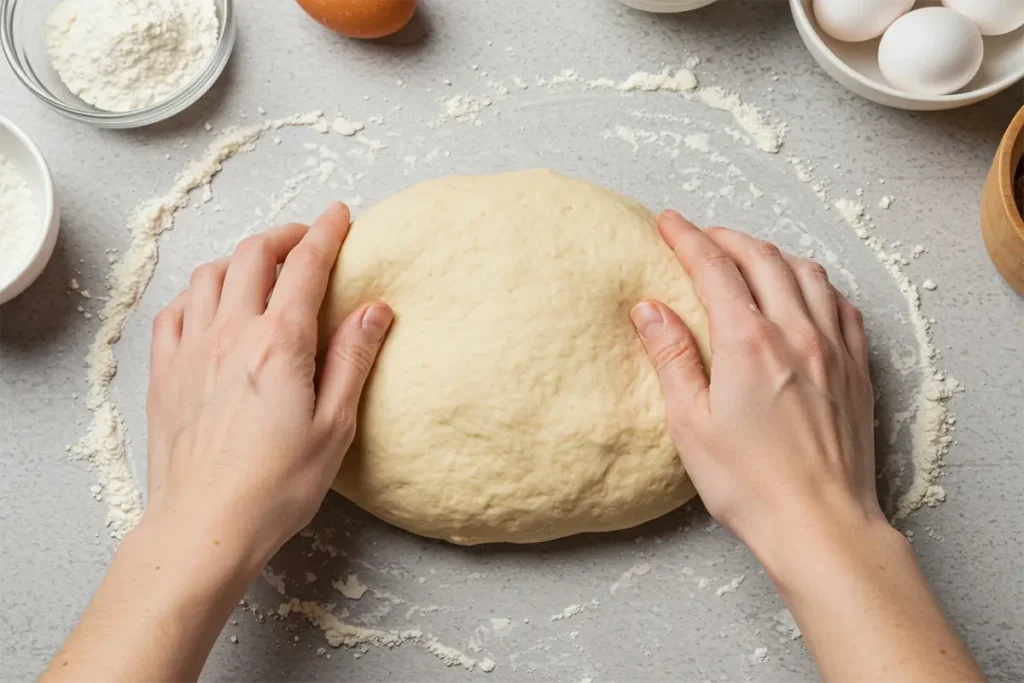
Mixing and Proofing the Dough
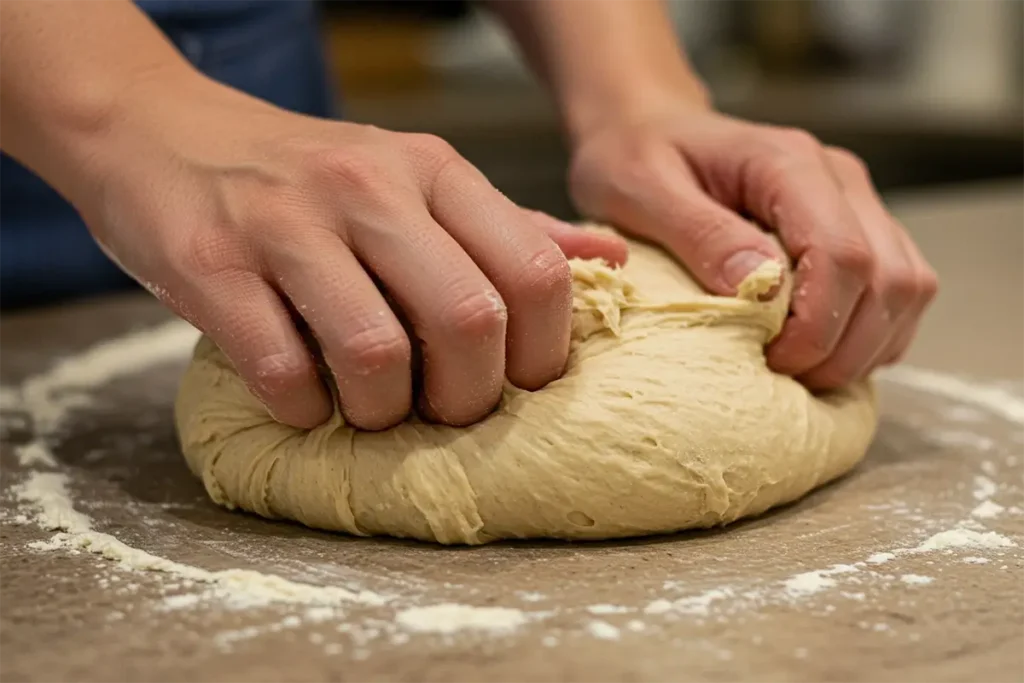
Once your starter is ready, it’s time to mix the dough and begin the first rise (proofing). Gluten free sourdough dough is much stickier than traditional dough, so don’t be alarmed if it’s not as pliable.
| Step | Details |
|---|---|
| Step 1: Combine Ingredients | In a large mixing bowl, combine your active sourdough starter, gluten free flour blend, psyllium husk, salt, and water. Stir until everything is well mixed. |
| Step 2: Knead and Shape | Though you won’t need to knead the dough as you would with wheat-based bread, it’s essential to incorporate air by folding the dough a few times. Shape into a round or oval loaf. |
| Step 3: First Proof | Transfer the dough into a proofing basket or a lightly oiled bowl. Cover with a damp cloth or plastic wrap and let it rise at room temperature for 4-6 hours, or until it has visibly expanded. |
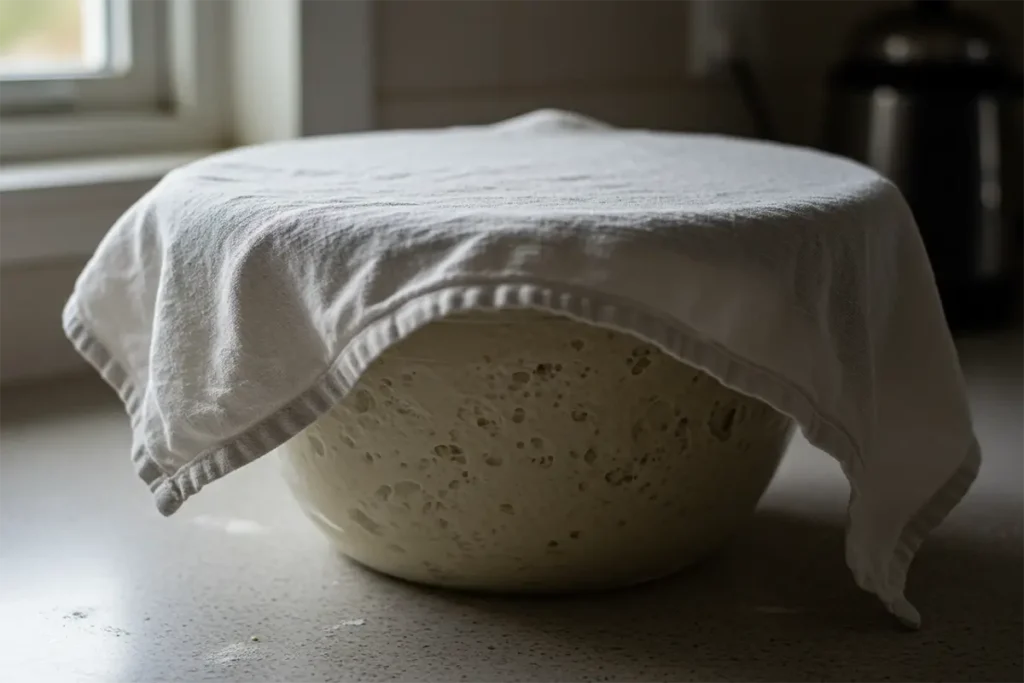
Tip: If your kitchen is cold, you can create a warm environment by placing the dough in the oven with just the light on or covering it with a warm towel.
Baking the Bread
Baking gluten free sourdough bread requires some special attention to get the perfect crust and texture. With the right baking technique, you’ll get a crisp outer crust and a soft, chewy interior.
| Step | Details |
|---|---|
| Step 1: Preheat the Oven | Preheat your oven to 475°F (245°C) for at least 30 minutes. If you’re using a Dutch oven, place it inside the oven while preheating. |
| Step 2: Score the Dough | Before baking, use a sharp knife or bread lame to score the top of the dough. This helps the bread expand properly during baking. |
| Step 3: Bake Covered | Place your dough in a preheated Dutch oven or a baking sheet. If using a Dutch oven, cover it with the lid to retain moisture. Bake for 20 minutes. |
| Step 4: Bake Uncovered | After 20 minutes, remove the lid (if using a Dutch oven) and bake for an additional 20-25 minutes, until the bread has a deep golden brown color and sounds hollow when tapped. |
| Step 5: Cool the Bread | Remove the bread from the oven and let it cool on a wire rack for at least 30 minutes. Cooling helps the bread finish setting up and improves the texture. |
Tip: If you like a super-crusty bread, you can add steam to the oven during the first 10 minutes of baking by placing a small pan of hot water on the bottom rack.

Troubleshooting Common Issues
Even experienced bakers run into challenges, especially when making gluten free bread. Here are a few common problems and how to fix them:
| Problem | Possible Causes and Solutions |
|---|---|
| Bread is too dense | – Insufficient rise or overmixing. – Solution: Ensure the starter is active, and give the dough enough time to rise. Consider adding more psyllium husk. |
| Crust is too hard | – Oven temperature may be too high or baking time too long. – Solution: Lower the baking temperature slightly and reduce the baking time for a softer crust. |
| Bread is too sticky | – Not enough flour or too much water. – Solution: Gradually add more flour to achieve the right consistency, but avoid making it too dry. |
With patience and practice, you’ll soon master the art of gluten free sourdough bread baking. The process may take a bit of time, but the end result—a flavorful, soft, and tangy loaf—is definitely worth the wait.
Pro Tips for Perfect Gluten Free Sourdough Every Time
Achieving the perfect gluten free sourdough loaf requires attention to detail, a little patience, and a few pro tips. Whether you’re new to gluten free baking or an experienced sourdough baker, these expert insights will help you refine your technique and achieve consistent, delicious results with every bake.
Choosing the Right Flour Combinations
Flour selection is one of the most important factors in gluten free sourdough. Since gluten free flours behave differently from wheat, it’s essential to use a blend that will give your bread the right structure and texture.
- Rice flour forms the base of most gluten free flour blends due to its lightness and ability to absorb moisture. It helps create a soft crumb.
- Sorghum flour adds a mild, nutty flavor and helps provide structure, making it a great complement to rice flour.
- Tapioca starch or potato starch helps with moisture retention and creates a light, airy texture in the bread.
- Almond flour adds richness and flavor while keeping the dough moist, which is especially important in gluten free baking.
To create a balanced texture, it’s often best to use a combination of these flours. For example, a mixture of 40% rice flour, 30% sorghum, and 30% starch (such as tapioca) works well to provide both softness and structure.
Adjusting for Climate and Humidity
The environment in which you’re baking plays a significant role in how your dough rises and behaves. Temperature, humidity, and even altitude can affect fermentation and proofing times.
- Temperature: If your kitchen is too cold, your dough may take longer to rise. To help with this, try placing the dough in a warm spot, such as an oven with just the light on, or near a heater. Alternatively, a proofing box can provide a more controlled environment.
- Humidity: High humidity levels can make the dough sticky and affect the texture of your bread. If you’re baking in a humid environment, you may need to adjust the flour-to-water ratio to achieve the right dough consistency.
- Altitude: If you’re baking at a higher altitude, the dough may rise faster due to thinner air. In this case, slightly reduce the amount of yeast and increase the hydration (water) in your dough to prevent overproofing.
Baking with Steam for a Better Crust
One of the key characteristics of a perfect sourdough loaf is its crispy, golden-brown crust. Adding steam during the first few minutes of baking helps your bread expand properly, resulting in a better rise and a crustier exterior.
- Using a Dutch oven: A covered Dutch oven is ideal for trapping steam, which keeps the dough moist and allows it to expand during baking. If you use a Dutch oven, remember to remove the lid during the last 20 minutes of baking to allow the crust to brown.
- Spraying water in the oven: If you don’t have a Dutch oven, you can spray water into the oven before placing the dough inside. This adds moisture to the air and creates steam, which helps form a crisp crust.
- Using a water pan: Another option is placing a shallow pan of hot water at the bottom of the oven while it preheats. The steam from the hot water helps the dough rise more easily.
Steam is key to achieving the signature sourdough crust, so don’t skip this step.
Mastering Proofing and Timing
Proofing (the process of letting the dough rise) is critical to the final texture and rise of your bread. If you underproof the dough, your loaf may be dense, while overproofing can cause it to collapse. Getting proofing times just right will lead to a beautifully airy loaf with a nice crumb.
- First proof (bulk fermentation): After mixing the dough, let it rise until it’s about doubled in size. This may take 4-6 hours depending on the temperature of your environment. The dough should look slightly puffy but not overly inflated.
- Second proof (shaping): After shaping the dough into a loaf, give it a second rise. The dough should be soft and slightly puffed, but don’t let it rise too long or it may overproof.
- Final proof: A gentle poke with your finger should leave a small indentation that doesn’t immediately spring back. This is a sign that the dough is ready for baking.
If you’re unsure about proofing times, trust your senses. The dough should feel soft and slightly airy, not overly firm or dry.
Storing and Freezing Gluten Free Sourdough
Once you’ve baked your perfect gluten free sourdough, it’s important to store it properly so it stays fresh. Gluten free bread can dry out faster than regular bread, so proper storage is key.
- Room temperature: For best results, store your sourdough in a cool, dry place, either in a bread bag or wrapped in a cloth. It should last for 2-3 days at room temperature.
- Freezing: If you have leftover bread or want to prepare ahead, gluten free sourdough freezes well. Slice the bread before freezing so you can thaw individual slices as needed. Wrap the bread tightly in plastic wrap and foil to prevent freezer burn.
- Refreshing frozen bread: To restore the freshness of frozen sourdough, pop a slice in the toaster or warm it in the oven for a few minutes. This will revive the crust and bring back the bread’s soft interior.
With these pro tips, you’ll be well on your way to baking the perfect gluten free sourdough bread every time. Patience, attention to detail, and a bit of practice are all you need to master the art of gluten free sourdough. Whether you’re a beginner or a seasoned baker, these tips will help you create bakery-quality bread right in your own kitchen.
Frequently Asked Questions about Gluten Free Sourdough Bread
Here are some of the most common questions people have when making gluten free sourdough bread. These answers will help clarify some of the mysteries of gluten free baking and guide you toward a perfect loaf every time.
1. Can I make gluten free sourdough bread without a starter?
No, you cannot make gluten free sourdough bread without a starter. The starter is the key to developing the natural yeast needed for fermentation and rise. While you can use commercial yeast for quicker bread, traditional sourdough requires a natural starter, which gives the bread its characteristic tangy flavor. You can create a gluten free sourdough starter using gluten free flours like rice flour and sorghum.
2. Why is my gluten free sourdough bread so dense?
If your gluten free sourdough bread is dense, it could be due to underproofing, insufficient hydration, or using the wrong flour blend. Gluten free dough needs time to rise, and if it’s not proofed long enough, the yeast doesn’t have enough time to expand the dough properly. Make sure you’re using a proper gluten free flour blend, and ensure your dough has enough moisture to rise.
3. How long should I let my gluten free sourdough dough rise?
The rise time for gluten free sourdough dough varies depending on the temperature of your kitchen. In general, the dough should rise for 4-6 hours during the first proof and about 1-2 hours after shaping during the second proof. If your kitchen is cooler, you may need to extend the proofing time. The key is to let the dough double in size, and it should feel soft and airy when gently pressed.
4. Can I freeze gluten free sourdough bread?
Yes, you can freeze gluten free sourdough bread! Once it’s fully baked and cooled, slice the bread and wrap it tightly in plastic wrap or aluminum foil. Place the wrapped slices in an airtight freezer bag, and you can store them in the freezer for up to 3 months. To refresh frozen bread, toast it or warm it in the oven to bring back its soft texture and crispy crust.
5. How do I get a crispy crust on my gluten free sourdough bread?
A crispy crust is one of the hallmarks of gluten free sourdough bread, and it can be achieved by baking with steam. Using a Dutch oven to bake your bread is one of the best methods for trapping steam. Alternatively, you can spray water into the oven or place a shallow pan of water at the bottom of the oven while it’s preheating. This moisture helps the dough rise and forms a golden, crispy crust during baking.
6. What gluten free flours are best for sourdough bread?
The best gluten free flours for sourdough bread are typically a blend of rice flour, sorghum flour, tapioca starch, and sometimes almond flour. Rice flour serves as the base, providing lightness, while sorghum adds structure. Tapioca starch provides elasticity, and almond flour can contribute richness. A combination of these flours ensures the bread has both good texture and flavor.
7. How can I make my gluten free sourdough bread more flavorful?
To enhance the flavor of your gluten free sourdough bread, you can let the dough ferment longer, which will develop a deeper, tangier flavor. Additionally, using a well-established sourdough starter that has been fermenting for a few days will produce more complex flavors. You can also experiment with adding seeds or herbs to the dough to boost flavor and texture.
8. Can I use a bread machine to make gluten free sourdough bread?
While most bread machines are not designed for making sourdough, some models do have a gluten free setting that can be used for baking gluten free bread. However, making sourdough bread typically requires more hands-on attention for feeding the starter and proofing the dough. It is recommended to use a bread machine for simpler gluten free bread recipes, but for the best sourdough results, traditional hand preparation and baking in the oven are preferred.
These frequently asked questions should help clear up some of the confusion surrounding gluten free sourdough bread. Whether you’re new to gluten free baking or already have some experience, these answers will set you on the path to making the perfect loaf every time.
Conclusion:
Making gluten free sourdough bread at home is not just a baking project—it’s a rewarding journey that allows you to create a delicious, healthier alternative to traditional sourdough. With the right ingredients, a bit of patience, and the pro tips shared here, you’ll be able to bake a perfect loaf every time. Whether you’re enjoying it fresh from the oven or freezing it for later, this gluten free sourdough bread will quickly become a staple in your kitchen.
Remember, gluten free baking takes practice, but the results are well worth the effort. So, don’t be discouraged by a few bumps along the way—embrace the process, enjoy the results, and share your homemade bread with family and friends.
With this easy gluten free sourdough bread recipe, you’re not only baking a loaf of bread; you’re crafting a wholesome, satisfying experience that you can be proud of. Happy baking!